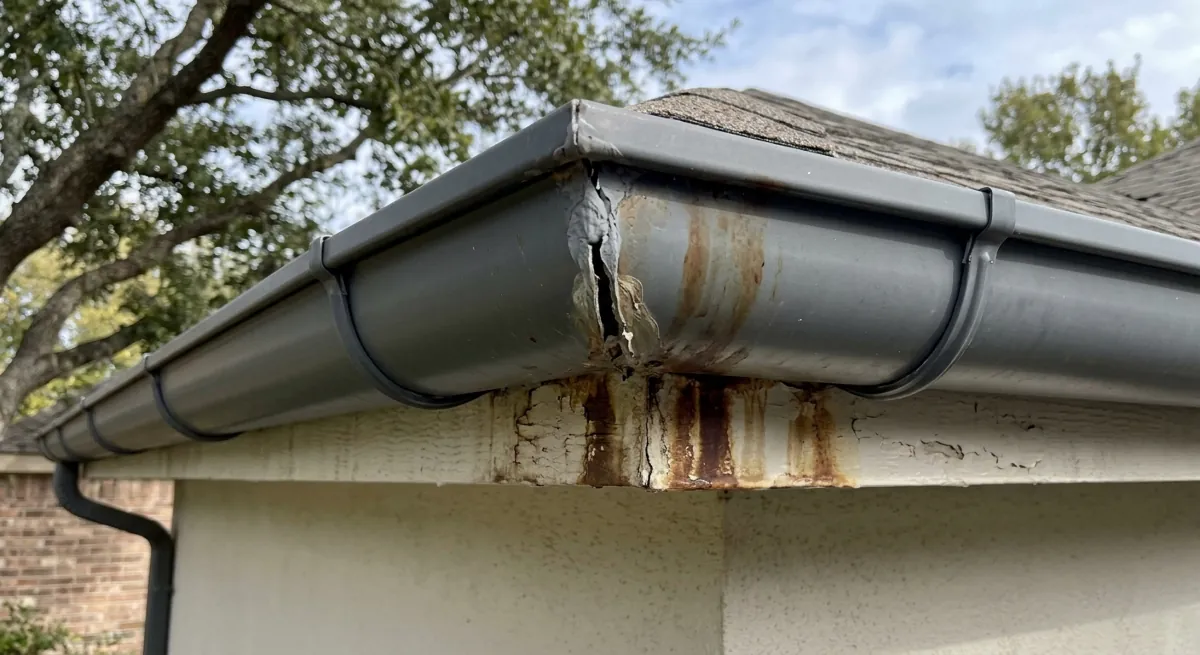
Half round miters leak for one reason that most homeowners and even experienced DIYers never identify correctly — and it is not the sealant. Every year, thousands of half-round gutter corners get re-caulked, re-sealed, and re-caulked again, and they keep leaking because the actual failure point was never addressed. After 31 years of production gutter installation, I can tell you exactly why half round miters leak, what the three root causes look like in the field, and what the permanent fix requires before the caulk tube comes out of the bag.
The 3 Real Reasons Half Round Miters Leak
While most installers blame a bad batch of sealant or a shifting fascia board, the real culprits behind a dripping corner happen before the caulk tube is ever opened. Understanding why half round miters leak starts with the geometry of the profile itself — and the three mechanical failure points that compound from there.
Reason 1 — Compound Angular Gaps
K-style gutter profile has flat faces at the miter joint. A flat face can absorb a minor scribing error and still seat reasonably flush. A half-round profile has zero tolerance for deviation. The curved cross-section means that a layout error of just one or two degrees creates a compound gap — a gap that runs across the full arc of the joint face rather than at a single point. That compound gap is why half round miters leak even when the installer thinks the cut looked close enough. Close enough does not exist on a curved profile. The two pieces of metal either seat flush across the full curve or they do not seat at all.
When a compound gap is present, the installer has two options: recut the joint correctly or load it with sealant and hope. The sealant option always fails. A thick sealant bridge over a compound gap has no mechanical support. It is spanning open air. The first thermal cycle — the first real temperature swing that causes the aluminum to expand and contract — begins stressing that unsupported sealant mass. By the end of the first winter, the bridge cracks. That crack is where the miter starts to leak.
Reason 2 — The Freeze-Thaw Stress Trap
This is the failure mode that catches most DIYers by surprise. They install the miter in summer, the sealant looks solid, the joint appears tight. Then the first hard freeze hits. Aluminum expands and contracts with temperature swings at a rate of approximately 0.0000128 inches per inch per degree Fahrenheit. On a 10-foot gutter run with a 60-degree temperature swing, that is nearly 1/8 inch of movement across the full run — and the miter joint absorbs a significant portion of that movement.
When a stress gap is present at the joint, the sealant is already working at its elastic limit just to bridge the opening. The thermal movement pushes it past that limit. The sealant cracks along the bond line, usually at the point of maximum gap width. Half round miters leak after their first winter for exactly this reason — not because the sealant failed chemically, but because the joint was never mechanically sound enough to survive the thermal load.
A joint where the two metal faces seat flush has almost no sealant gap to crack. The sealant in a correctly fitted miter is a waterproofing layer, not a structural bridge. That is the difference between a joint that lasts two seasons and one that lasts twenty years.
Reason 3 — Over-Scraped and Damaged Cut Edges
This failure mode is self-inflicted and extremely common. An installer makes a slightly off cut, realizes the miter does not seat flush, and tries to correct it by trimming the cut edge with snips. Hand-trimming a half-round miter cut after the initial cut destroys the straight, factory-sharp edge that a flush fit requires. Every snip pass introduces a new micro-deviation in the cut face. The edge becomes wavy, notched, or undercut — none of which produces the flat, continuous metal-to-metal contact the joint needs.
If the two pieces of metal do not seat flush on the dry fit — with no sealant, no pressure, just the two cut faces resting against each other — the joint is a slow-motion failure waiting to happen. The correct response to a bad cut is a new cut from a fresh piece of material, not remedial trimming on the original piece. Half round miters leak when installers try to salvage a bad cut instead of starting over with a correct template and a clean piece of metal.
The Permanent Fix — What Has to Happen Before the Sealant Comes Out
Stopping the cycle of half round miters leaking requires addressing all three root causes before the sealant tube is opened. Here is the correct sequence:
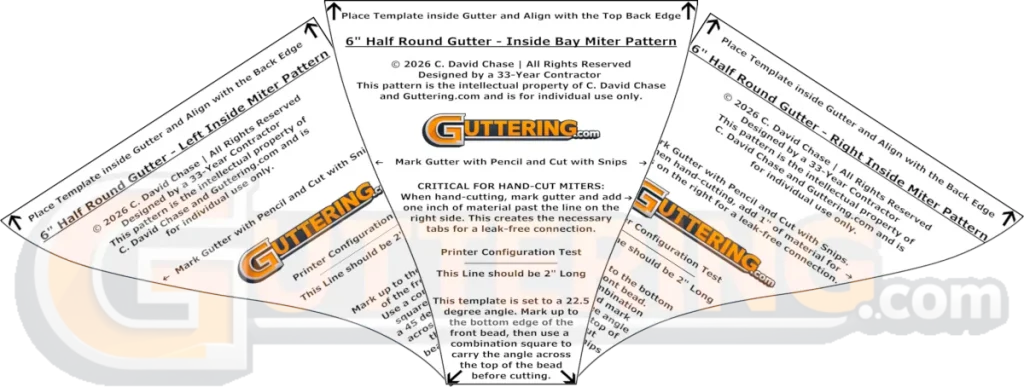
- Cut from a precision template — not freehand. The compound angular gap problem is entirely eliminated when the cut geometry is fixed in a template rather than eyeballed on the metal. A 300 DPI architectural-scale miter template transfers the exact angle and curved profile geometry onto the gutter section in a single scribing pass. No drift, no deviation, no compound gap
- Verify the dry fit before any sealant is applied. Place the two cut pieces together without sealant. The joint faces should make continuous metal-to-metal contact across the full arc of the profile. If you can see daylight through any point of the joint, the cut is not correct. Recut from a new piece before proceeding
- Use a tripolymer or polyurethane sealant — not silicone. Once the dry fit is confirmed flush, the sealant’s job is waterproofing, not gap-bridging. A tripolymer formula bonds to wet or dry aluminum, stays flexible through freeze-thaw cycling, and does not peel from the joint face the way silicone does after two winters. Silicone on a half-round gutter miter is a temporary fix regardless of how good the cut is
- Clamp or mechanically secure the joint while the sealant cures. Apply sealant to both miter faces, fit the joint, and immediately secure it with a pop rivet through the miter tab or a locking sheet metal clamp. Do not rely on hand pressure — thermal movement in the aluminum will open the joint before the sealant sets if it is not mechanically held in position
4 Safety Rules for Half-Round Sheet Metal Work
- Level A4 cut-resistant gloves — non-negotiable. A freshly cut aluminum edge is as sharp as a box cutter blade. Standard work gloves provide no meaningful protection. A careless grab at a cut miter section without proper gloves produces a serious laceration
- ANSI Z87.1 safety glasses during all cutting. Aviation snips throw metal chips and burr fragments on every cut stroke. Sunglasses are not rated eye protection
- File every cut edge before dry-fitting. Fifteen seconds with a flat mill file removes every burr and eliminates the primary hand laceration risk during fitting and test-fitting of miter sections
- Dispose of metal scrap immediately. Cut gutter miter scraps left on staging planks or on the ground are a consistent source of foot and hand injuries. Drop scrap directly into a metal waste container as you work
The Professional Shortcut — Stop Guessing the Geometry
The compound angular gap problem — the primary reason half round miters leak — is a geometry problem. Geometry problems have a tool-based solution. For 31 years I ran a custom set of steel miter templates on every half-round job. The geometry was fixed in the template. The cut was always correct. When I built Guttering.com, making that template system available to DIYers and professional installers was the first priority.
👉 Field-Tested Recommendation: The Miter Master Kit includes six 300 DPI precision PDF templates covering every corner type that causes half round miters to leak on a residential installation — 90-degree inside and outside corners and 22.5-degree bay window corners, left and right hand patterns for each. The Grandaddy Field Guide includes the 1-Inch Tab Rule, the Notching Secret, and the Seam-Seal Sequence. Instant digital download. Print, verify scale with the included calibration page, and cut correct miters the same day you order. SHOP THE 6 INCH HALF ROUND GUTTER MASTER MITER KIT
When you are working with premium materials, you have to account for serious thermal movement. According to the architectural installation data over at Copper.org, copper expands and contracts significantly more than standard vinyl or steel during extreme temperature swings. If your metal cuts don’t seat flush, that constant structural pulling will tear right through even the highest-grade commercial sealant.
Understanding why half round miters leak — and fixing all three root causes before the sealant comes out — is what separates a corner joint that holds for twenty years from one that needs to be re-caulked every season. Now that you have the full diagnostic breakdown and the correct repair sequence, head over to the guttering tools page for the complete field-tested kit I used in production work for 31 years — offset snips, rivet gun, Geocel tripolymer sealant, and every other item that earned its place through real job site conditions, not a product spec sheet.
As an Amazon Associate, I earn from qualifying purchases at no extra cost to you.