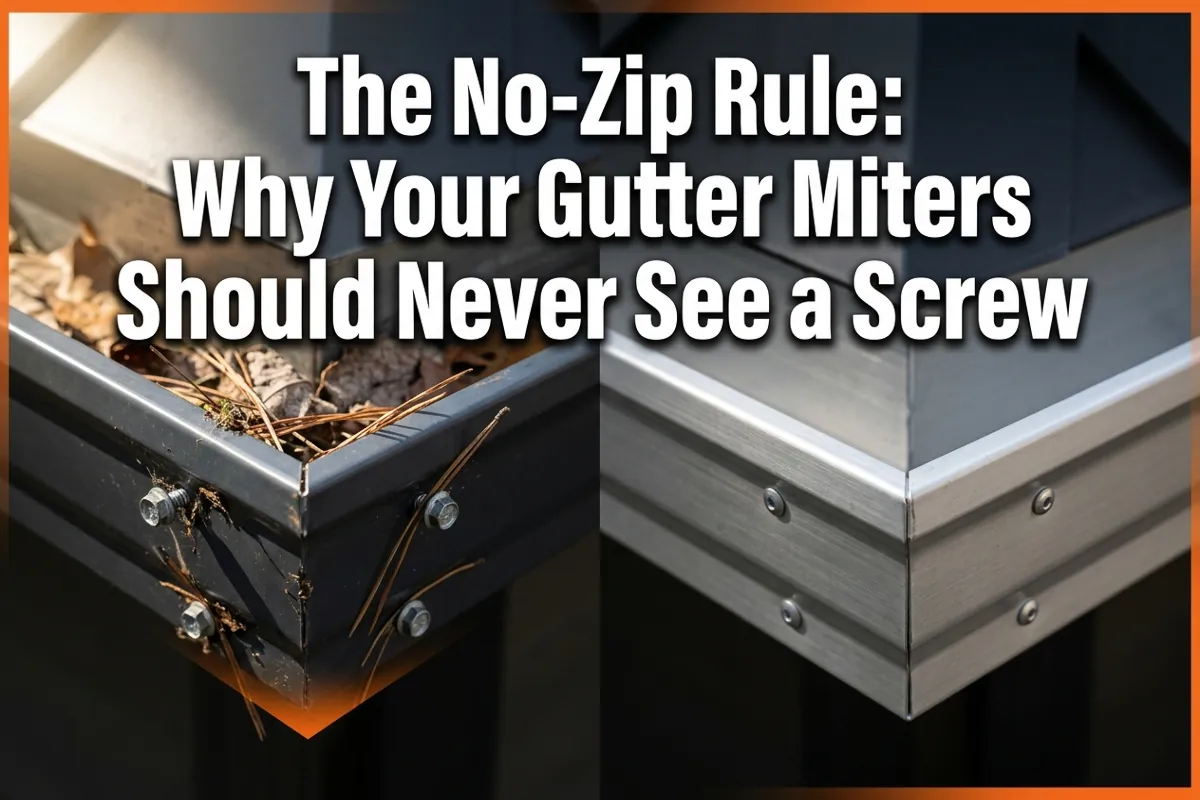
If you want to know if a gutter installer is a pro or just a guy with a ladder, look at his miters. If you see the heads of hex-screws, zip screws, sticking out of the corners, you’re looking at a failure waiting to happen. That’s the core of why your gutter miters should never see a screw, and after 31 years in the trades, I’ve made this a non-negotiable rule on every job I’ve touched.
Zip screws might be fast. They might feel solid in the moment. But they set up a chain of problems that will cost you real money, rot, debris dams, fascia damage, long before the rest of your gutter system shows any wear.
Hold the toolbox: I field-test every product mentioned here, some for 25 years. As an Amazon Associate, I earn from qualifying purchases at no extra cost to you.
Key Takeaways
- Zip screws left inside a gutter miter create snag points that collect debris and cause standing water.
- Standing water held against your fascia by a debris dam is the primary driver of premature rot.
- The professional standard for miter fastening is the 1/8″ aluminum pop rivet, flush, strong, and snag-free.
- The right rivet gun matters as much as the rivet itself; a cheap tool will jam and cost you time on the ladder.
- A properly riveted and sealed miter joint should outlast the roof it sits under.
The “Snag” Factor: The Real Reason Why Your Gutter Miters Should Never See a Screw
A zip screw is fast to drive. I get it. When you’re running a crew and trying to move through a 40-square job before noon, speed matters. But speed at the miter joint is a trade-off you will regret.
Here is exactly what happens after that screw goes in:
The screw head protrudes into the water channel. Even a low-profile hex head sticks up roughly a half-inch into the interior of the gutter trough. That half-inch is a spear pointed directly at everything flowing through your system.
Debris snags on the first pass. Pine needles, oak tassels, roof grit, and shingle granules all travel through your gutters during a rain event. The moment one pine needle catches on that screw shaft, it anchors. The next needle catches on the first. Within one or two seasons, you have a compacted debris mat building up at every corner.
The dam holds water against your fascia. This is where the real damage starts. Standing water at a corner miter means constant moisture exposure to your fascia board. Fascia rot is one of the most expensive repairs a homeowner faces, and it is almost always preventable. I’ve diagnosed dozens of jobs where the rot traced directly back to a screw-fastened miter that nobody thought twice about at installation.
It looks unprofessional from the ground. This matters to homeowners and to the reputation of any contractor putting their name on the job. Standing at the curb and looking up, those screw heads are visible. They signal a shortcut was taken.
The Thermal Expansion Problem Makes It Worse
Aluminum gutters expand and contract with temperature swings, sometimes as much as 1/4 inch per 10-foot run over a seasonal cycle. A rigid screw driven through a miter joint fights that movement. Over time, it works the metal around the hole, enlarging it and creating a leak path that no amount of caulk will fix permanently. A properly set pop rivet, by contrast, allows a micro-amount of flex at the joint while maintaining a watertight seal when combined with the right sealant.
Field-tested fact: Thermal expansion is the root cause of most miter leaks I diagnose on jobs that were installed with screws. The hole around the screw enlarges. The sealant cracks. Water finds its way through.
The Professional Standard: Pop Rivets and the Right Tool for the Job
The fix is not complicated. It just requires using the right fastener and the right tool, and not skipping steps.
Why 1/8″ Aluminum Pop Rivets Are the Correct Choice
1/8″ aluminum pop rivets are the contractor-grade standard for miter joints, downspout connections, and gutter guard attachment. Here is why they win on every metric:
| Feature | Zip Screw | 1/8″ Aluminum Pop Rivet |
|---|---|---|
| Interior profile | Protrudes 1/2″ into channel | Flush or near-flush |
| Debris snag risk | High | None |
| Thermal flex tolerance | Low, works the hole | Moderate, allows micro-flex |
| Long-term seal integrity | Degrades as hole enlarges | Stable when properly set |
| Appearance from ground | Unprofessional | Clean, invisible |
| Installation speed (with right gun) | Fast | Equally fast |
When you combine a properly set pop rivet with a tripolymer sealant applied to the miter seam before assembly, the joint becomes a single unified piece of metal. Water has nowhere to go except where you want it, toward the downspout.
Drill Bit Selection Matters
Before you can set a rivet, you need a clean hole. For 1/8″ aluminum rivets, a #30 drill bit is the correct size. It gives you a snug fit without slop. A hole that is too large lets the rivet head pull through under load. A hole that is too small will shear your mandrel before the rivet sets. Get the right bit, drill clean, and your rivets will set perfectly every time.
The 20-Year Workhorse: Why the Malco Rivet Gun Is the Only Tool I Recommend
Tool selection is where a lot of DIYers and even newer contractors cut corners and then wonder why the job fights them. A rivet gun is not a rivet gun. The difference between a $12 big-box store model and a professional-grade tool is the difference between a smooth installation and a jammed mandrel 20 feet off the ground with one hand on a ladder.
Check the price on Amazon for the Malco Rivet Gun I have used over 20 years. The same gun. I have dropped it off roofs, off ladders, and off staging. It has bounced off concrete driveways. It keeps snapping rivets.
What Makes the Malco Different
- Heavy-duty steel construction that does not flex under load. Cheap guns flex, which means inconsistent mandrel pull and misfired rivets.
- Single-hand operation. This is critical on the roofline. When you are holding a miter tight against a corner with one hand, you cannot afford a gun that requires two hands to operate.
- Mandrel collection chamber that actually holds the spent mandrels instead of dropping them into your gutter or onto the homeowner’s landscaping.
- Consistent pull force across aluminum, steel, and stainless rivets without adjustment.
Most cheap rivet guns jam after ten or fifteen clicks when the mandrel collection chamber fills or the mechanism wears. On a full gutter installation, you are setting dozens of rivets. A jamming gun on a ladder is a safety issue, not just an inconvenience.
Building Your Corner Right, The Full Process
Here is the field-tested sequence I use on every miter joint:
- Cut your miter to fit. Measure twice. A gap at the joint is a leak point no rivet will fix.
- Dry-fit and check alignment. The joint should sit flush with no visible gap from the front face.
- Apply polyurethane sealant to the miter seam. Run a continuous bead on the interior contact surface before final assembly.
- Hold the joint firmly and drill your rivet holes using a #30 bit.
- Set your 1/8″ aluminum rivets with the Malco. You will hear and feel the mandrel snap cleanly when the rivet is properly set.
That is it. A corner built this way will not leak, will not snag debris, and will not embarrass you from the curb.
Conclusion
The no-zip rule is not a preference. It is the correct standard for any gutter installation that is built to last. After 31 years in the trades, I have seen what zip screws do to corners over a five- to ten-year span, the debris dams, the fascia rot, the leak paths that open up as thermal expansion works the holes wider. None of it is inevitable. All of it is preventable.
Your next steps are straightforward:
- Audit your existing miters. If you see screw heads, plan to re-do those joints before next season.
- Pick up a box of 1/8″ aluminum pop rivets and a set of #30 drill bits.
- Invest in a Malco rivet gun. One tool, 20-plus years of reliable service.
- Use tripolymer sealant at every miter seam before you set your rivets.
Check out the rest of my Master Gutter Tool Box for the exact professional-grade tools I have used for over 20 years. Build the corner right the first time, and you will never pull it apart again.