If you’ve ever tried to join two sections of downspout only to find they are exactly the same diameter, you already know the frustration. You grab a pair of standard pliers. You squeeze. You twist. You force it.
Before we open up the toolbox, a quick note: I field-test any products mentioned here. As an Amazon Associate, I earn from qualifying purchases at no extra cost to you.
Key Takeaways
- A 5-blade crimper reduces the circumference of a downspout end uniformly, creating a factory-tight friction fit between sections.
- The Malco C5 is the contractor-grade standard for this task, its compound leverage handles heavy-gauge .032 aluminum without cracking paint or metal.
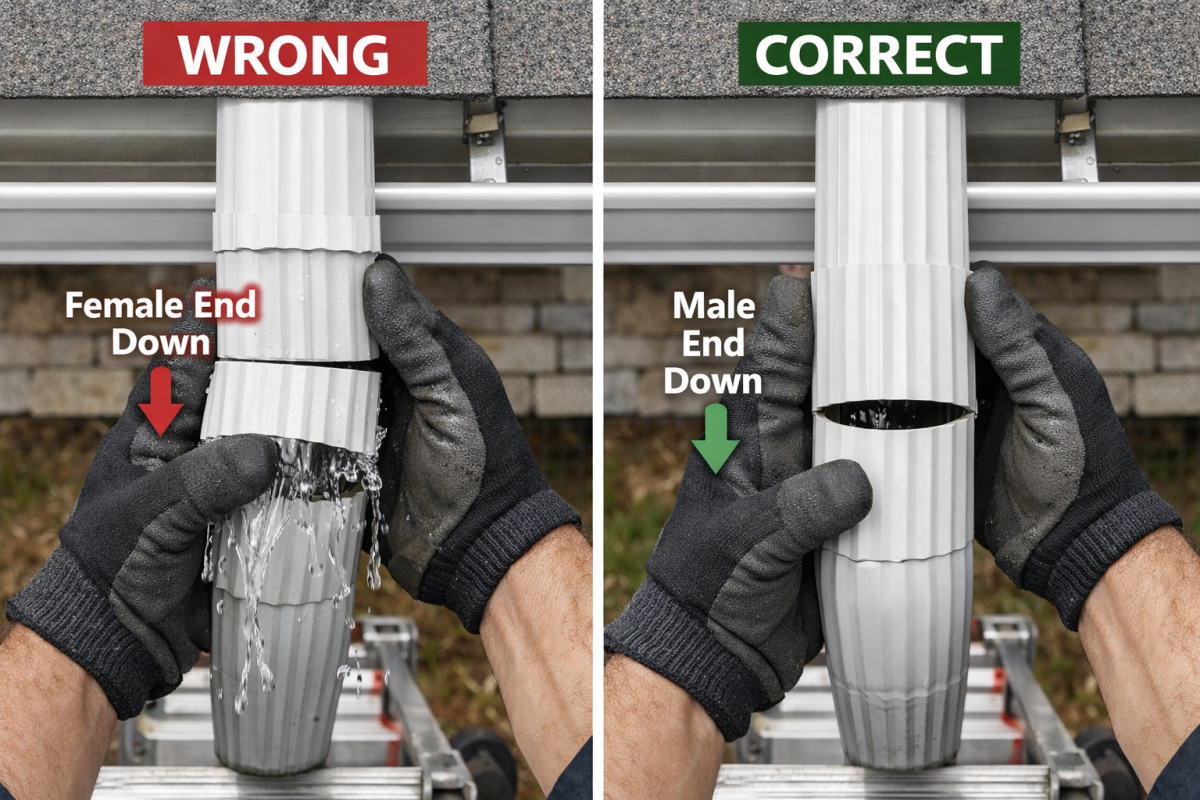
- The crimped “male” end must always point downward. Reversing it creates a debris ledge and guarantees a blowout in heavy rain.
- Standard pliers crush and distort metal unevenly. They are not a substitute for a proper crimping tool.
- One correct tool purchase eliminates one of the most common causes of downspout joint failure.
How the 5-Blade System Works
A standard pair of pliers only crushes metal. It applies pressure at one or two points, which deforms the cross-section unevenly. The result is a connection that looks pinched on two sides and still too wide on the others. Water finds those gaps immediately.
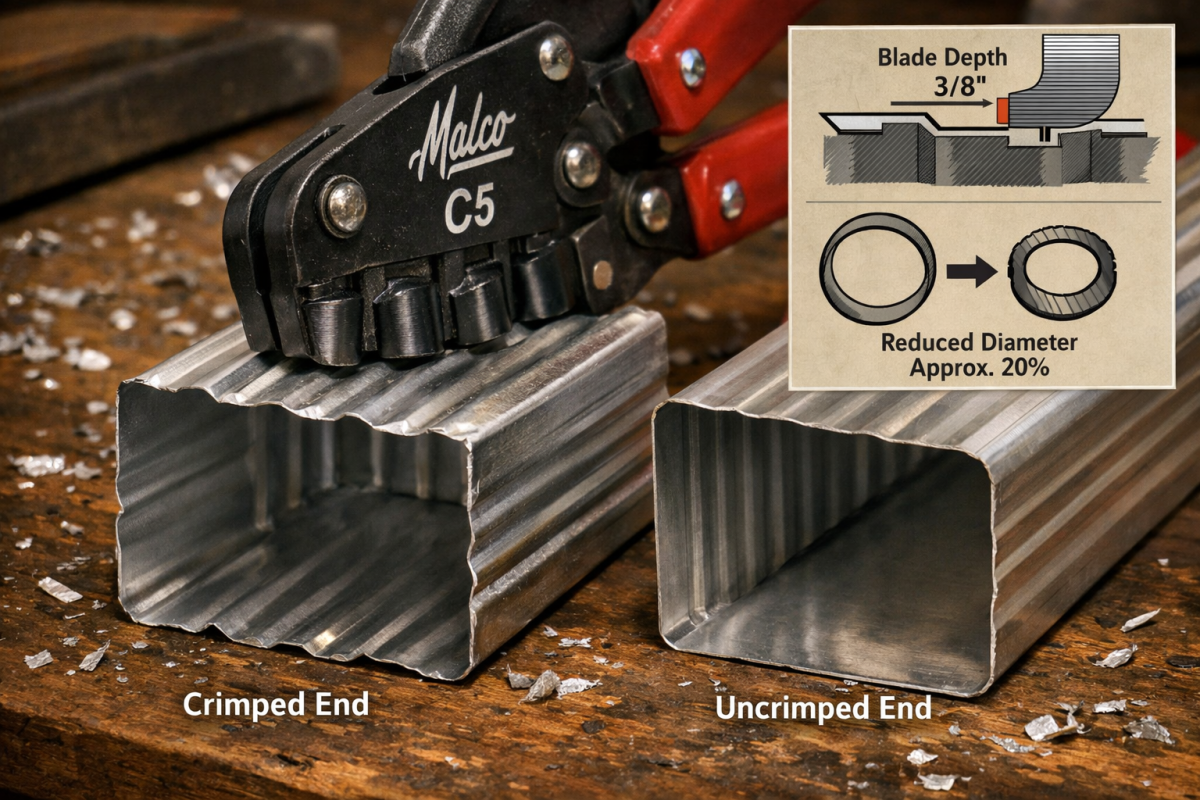
The Malco C5 takes a completely different approach. Its specialized 5-blade head creates five uniform, evenly-spaced indentations around the entire perimeter of the downspout end in a single squeeze. That is the key difference. Instead of crushing, it crimps, and there is a significant mechanical distinction between those two actions.
What the Crimp Actually Does
When the five blades press into the metal simultaneously, they reduce the effective circumference of that end of the downspout. The indentations push the metal inward at five consistent points, which slightly contracts the overall profile. That contracted end, the “male” end, now slides cleanly into the full-diameter section of the next downspout piece below it.
The fit is tight. It is friction-based. And when you add a bead of quality gutter sealant to that joint before assembly, you have a connection that handles thermal expansion, heavy debris loads, and years of freeze-thaw cycles without opening up.
“The right crimp does not just hold the joint together, it controls where the water goes. Inside the pipe, not outside it.”
This is what proper water diversion looks like at the joint level. It is not complicated, but it requires the right tool to execute correctly.
The Real-World Advantage of Malco: Why You Need a Malco 5-Blade Crimper on Every Job
I have used a lot of crimpers over 31 years. Cheap imports, off-brand knock-offs, and tools that looked fine on the shelf but failed within a season. The Malco C5 has stayed in my kit because it consistently delivers on three things that matter in the field.
Compound Leverage
The handle geometry on the Malco C5 is engineered to multiply your grip strength. Even working with heavier-gauge .032 aluminum, which is the material I specify on all my high-end residential jobs, the tool does not fight you. You apply reasonable hand pressure, and the blades seat cleanly and consistently. On a cold morning at the top of a 24-foot ladder, that matters.
Consistent Blade Depth
This is where cheap tools fail every time. If the blades are not set to a precise, consistent depth, you get one of two problems:
- Too shallow: The crimp does not reduce the circumference enough. The male end still does not fit into the female section. You are back to forcing it.
- Too deep: The blades crack the paint, stress the metal, and can split the corner seams on rectangular downspout. Now you have a leak point built right into the crimp itself.
The Malco blades are calibrated to hit the correct depth for standard residential downspout gauges. That is not an accident, it is precision manufacturing. Contractor-grade quality shows up in the details like this.
Ergonomics Under Real Conditions
The red grip handles are not just a color choice. They are designed for a secure hold in wet conditions. When you are working off a ladder in the rain, which happens on real jobs, not just in ideal conditions, a tool that slips is a tool that can send you off the ladder or send the downspout section to the ground. The Malco grip stays put.
Check the current price of the Malco C5 Downspout Crimper on Amazon.
TOOL COMPARISON: Crimper vs. Pliers
| Factor | Standard Pliers | Malco C5 Crimper |
|---|---|---|
| Contact Points | 1-2 uneven points | 5 uniform blades |
| Circumference Reduction | Inconsistent, unpredictable | Precise, repeatable |
| Paint/Metal Damage | High risk of cracking | Calibrated depth, minimal damage |
| Joint Leak Risk | High, gaps remain | Low, tight friction fit |
| Ladder Safety | Awkward, two-handed fighting | Single-hand operation, secure grip |
Contractor’s Tip: The Flow Rule and Why Direction Matters
This is the single most common mistake I see on DIY downspout installations. It costs nothing to get right, and it costs a lot to fix after the fact.
The crimped end, the male end, always points down.
Here is the logic, and it is straightforward once you see it:
- The crimped end is smaller in diameter than the uncrimped section.
- The uncrimped section above it is the full diameter, the female end.
- Water falls from the wider female section into the narrower male section below.
- The joint is smooth on the inside, and water passes through without interruption.
If you reverse this orientation, the crimped end faces up into the flow of water. You have now created a small ledge inside the downspout where water hits the edge of the crimp. Debris catches on that ledge. Sediment builds up. During a heavy rain event, that blockage causes a pressure buildup, and the joint blows apart, usually at the worst possible time.
Step-by-Step: Correct Downspout Crimping and Assembly
- Identify which end of the upper downspout section will connect to the lower section.
- Apply the Malco C5 to that lower end of the upper section, working around the perimeter with 3-4 overlapping crimps until the full circumference is reduced.
- Test-fit the crimped end into the top of the lower section before applying sealant. It should slide in with moderate hand pressure.
- Apply a continuous bead of quality gutter sealant around the inside of the female end.
- Seat the crimped male end fully into the female section.
- Secure with two sheet metal screws on opposing sides if the joint is in a high-wind exposure area.
That is it. Clean, fast, and built to last.
Long-Term Durability: Why the Right Crimp Prevents Bigger Problems
A failed downspout joint is not just an aesthetic issue. In my diagnostic approach to water intrusion problems, I trace a significant number of foundation moisture issues, soffit rot cases, and basement seepage problems directly back to downspout joint failures. Water that exits a joint halfway down the wall does not go where you planned. It goes where gravity and capillary action take it, which is usually into your structure.
The material performance of a properly crimped and sealed joint is measurably better over time. Thermal expansion cycles, which cause aluminum to move seasonally, are accommodated by the friction fit of a proper crimp in a way that a forced, deformed connection simply cannot match. A forced joint is already stressed at the metal. It has no tolerance left for movement.
Preventative maintenance on downspout connections means inspecting crimped joints annually, particularly after the first hard freeze of the season, and resealing any joint that shows daylight or separation. A properly crimped joint with quality sealant should give you a decade or more of service without attention.
Ready to build out your full drainage toolkit? Visit the Master Gutter Tool and Material List to see the other tools I never go to a job site without.
Conclusion
The downspout struggle is real, but it is also completely solvable. After 31 years in the trades, the answer to why you need a Malco 5-blade crimper comes down to this: it is the only tool that does the job correctly the first time. It creates a uniform, calibrated crimp that reduces circumference without damaging the metal. It gives you a friction fit that holds. And when you pair it with correct orientation, male end down, and a quality sealant bead, you have a joint that handles everything the weather throws at it.
Do not waste time with pliers, improvised methods, or cheap knock-off crimpers. Buy the right tool once. Crimp it correctly. Move on to the next problem.